#
Managing QGIS Projects
A QGIS project is a collection of layers and settings that make up a QGIS map. Pozi uses these projects as layer catalogues, each of which is displayed in Pozi as a layer group.
The workflow for getting a project into Pozi are as follows:
create project configure web services start adding layers register project for Pozi
#
Create Project
If you have an existing QGIS project that's already configured for Pozi, you can fast-track the steps below.
Save a copy of an existing project, remove all layers (except for any basemap that you might be using as a background layer), and skip to
Create new project from scratch:
- open QGIS
- Project > Save > specify name and path of new project file (
.qgs) - note the exact file path of project file (needed for subsequent configuration below)
#
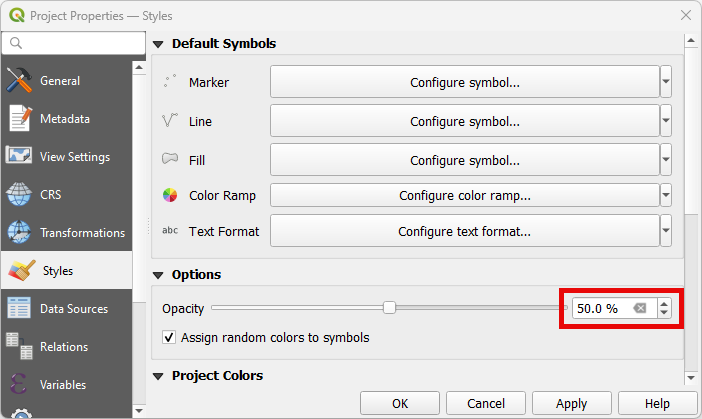
Set Default Styles
By default, the opacity of any new layers you add to your QGIS project may be set to 100%. This can prevent users from seeing important details that covered by polygon features. To avoid new layers being set to 100% opacity, set the project's default opacity to 50%.
#
Add Basemap
It's useful to include a basemap in the project to provide visual context for the layers you will add on top.
#
Vicmap Basemap Example
If you've set up 'Vicmap Basemap' as a WMS/WMTS source, you can easily one of its layers as your basemap.
Browser > WMS/WMTS > Vicmap Basemap > Vicmap Basemap - VicGrid2020 - Cartographic
Ensure that you exclude the basemap from WMS to prevent it appearing in Pozi. See here for more information.
#
Configure Web Services
For non-Azure implementations, follow the Legacy instructions immediately below to configure the necessary advertised URL. For Azure implementations, skip to Settings underneath.
The project's Advertised URL is a URL at which WMS and WFS requests can interact with the layers in the project file. Essentially, the project file needs a reference to itself in a URL format.
This step involves constructing the URL text that will be used in subsequent configuration below. You can use a temporary blank text document in Notepad to compile the text.
Combine the details below to create your project's Advertised URL:
- server URL (server URL is typically
https://<servername>.pozi.com/, but check your local setup for any custom endpoint - older implementations may usehttps://local.pozi.com/) - service endpoint (eg
iis/qgisserver?) - QGIS project file path, with any backslashes replaced with forward slashes (eg
MAP=C:/Pozi/Projects/Assets.qgs)
Combine these three text strings to create the Advertised URL.
Example Advertised URL:
https://<servername>.pozi.com/iis/qgisserver?MAP=<projectfilepath>Copy the URL to your clipboard and paste into the Advertised URL field in the following locations.
Project > Properties > QGIS Server
- WMS
Advertised URL - WMTS
Advertised URL - WFS/OAPIF
Advertised URL
#
Settings
Project > Properties > QGIS Server > WMS
Exclude layers(tick) > add > pick any background layers you don't need to see in PoziUse layer ids as names: ensure this is NOT tickedAdd geometry to feature response: tick ON
#
Further Settings
A comprehensive guide for configuring QGIS projects for publishing layers via WMS/WFS can be found at:
https://docs.qgis.org/latest/en/docs/server_manual/getting_started.html#creatingwmsfromproject
#
Add Layers
See Configuring Layers for details about adding and configuring new layers within your project.
Remember to use only UNC paths for file-based layers.
When you're done, remember to enable any layers for WFS if required.
#
Assign Profiles
Pozi "profiles" are a way to present separate streamlined views of your organisation's layers for a variety of workflows. Users can switch between profiles using the dropdown menu in the layer panel to see a filtered view of all the available layers and search options. Profiles enable users to view a subset of layers for a given task at hand, and to switch profiles to view other layers for which they have been granted permissions.
Any given map catalogue can be assigned zero or one or more profile names in the QGIS project using a keyword parameter. If Pozi is launched with a profile parameter in the URL (eg ../#/profile[assets]/), or if the user picks a profile from the dropdown menu at the top of the layer panel, Pozi will display only those catalogues that have been configured with that profile name.
The keyword is defined at the catalogue level (ie, not layer level). When Pozi loads the catalogue, it checks for the presence of any profile keywords. If any profiles are found, Pozi adds a dropdown menu at the top of the layer panel listing each available profile.
Project > Properties > QGIS Server > Services Capabilities > Keyword list
Example: profiles=Assets;Infrastructure
(Separate multiple profile names with semicolons.)
#
Test Project Load Performance
The speed at which Pozi can access layers from the QGIS project is limited by how fast QGIS can access the layers from their respective data sources.
To ensure that QGIS is able to access the layers quickly, check the project's performance using QGIS's debugging tool to identify any performance issues.
View > Panels > Debugging/Development Tools > Profiler (clock button)
As soon as you load your QGIS project, a new category called Project Load will be available. Select it from the category list.
Expand the entry called Reading map layers in the profiler tree to see all of the QGIS project layers and their corresponding loading time.
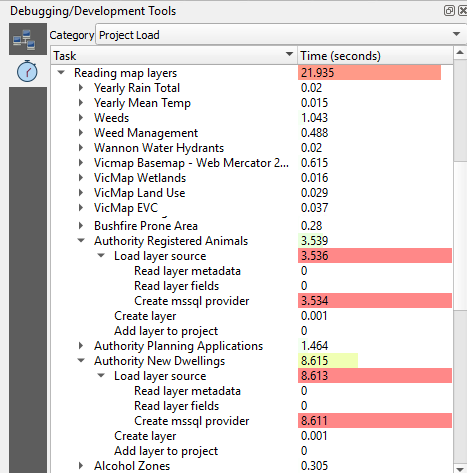
If the results show any layer that takes more than a fraction of a second to load, there may be an issue with the network or database that is worth investigating.
Some file formats can be less efficient than others for a project to load. Large GeoJSON files can be significantly slower to load than a their equivalent SHP, GeoPackage or TAB version, so consider using one of these faster formats.
#
Register Project
Your new project must be registered in Pozi's central web configuration for users to view the map layers in your Pozi site.
For non-Azure implementations, follow the Legacy instructions immediately below to obtain the project's GetProjectSettings URL. For Azure implementations, skip ahead to Submit Helpdesk Ticket.
In a text editor, construct a GetProjectSettings URL by combining the following:
- Advertised URL from above (eg
https://<servername>.pozi.com/iis/qgisserver?MAP=<projectfilepath>) - GetProjectSettings request:
&service=WMS&REQUEST=GetProjectSettings
Combine these text strings to create a GetProjectSettings URL.
Example GetProjectSettings URL:
https://<servername>.pozi.com/iis/qgisserver?MAP=<projectfilepath>&service=WMS&request=GetProjectSettingsTest this URL by pasting it in your browser and check that you get a valid response that lists the available layers.
#
Submit Helpdesk Ticket
Email support@pozi.com with these details:
- subject: New layer catalogue
- name of new layer group to appear in Pozi layer panel
- order in which the layer group is to appear in the Pozi Layer Panel (relative to an existing layer group)
- file path of the QGIS project (or the
GetProjectSettingsURL for legacy implementation)
Within 24 hours, the new layer group will be configured and available for users to view in Pozi.
During this time, and any time afterwards, you may continue to add and configure layers in your new project.
#
Troubleshooting
QGIS projects can fail to return layers if there are projection transformations specified the in the project.
Remove any transformations from the project, then save the project and try again.
Project > Properties > Transformations > select and remove any listed transformations
![]()
As a preventive measure, see this page about disabling QGIS's prompt that causes transformation settings to be added to the project.
For Azure implementations, ensure that QGIS Server WMS and WFS Advertised URLs are blank. For non-Azure implementations, ensure the Advertised URL contains the exact path and file name of the .qgs project file.
Ensure that Use layer ids as names is NOT ticked. See Project > Properties > QGIS Server > WMS.
Check the Network panel in your browser console as you turn on layers. Look at the GetFeature requests and preview the response. If it contains bounding box coordinates but no records, there may be an issue with IIS.
Open the IIS Manager, and recycle the PoziQgisServer application pool.

Go to Project > Properties > QGIS Server > WMS > Add geometry to feature response > tick ON
For further assistance, contact support@pozi.com.