#
Azure AD Application Proxy
Azure AD integration is a feature of the Pozi Enterprise Cloud offering.
Pozi's Azure AD Application Proxy integration enables your organisation's staff and other authorised users to access internal data sources in Pozi without needing to be connected to your network.
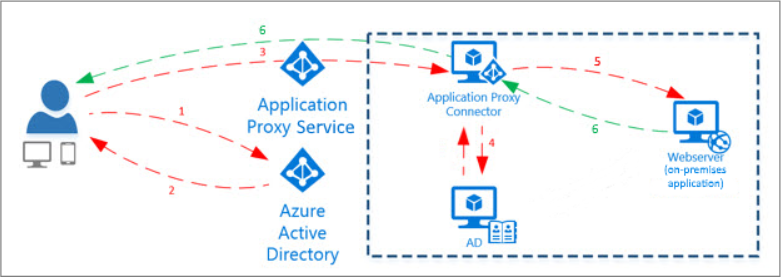
#
How it works
- user visits the dedicated Pozi Enterprise address (eg
<sitename>.enterprise.pozi.com
) - Pozi app sends a request to client's MS App Proxy endpoint (eg
https://<poziservername>-<councilname>.msapproxy.net/resourcecheck/<sitename>.json
) - if user is signed in to their Microsoft account, Pozi continues to load, and the user will have access to the internal datasets configured for Pozi within the organisation's app proxy
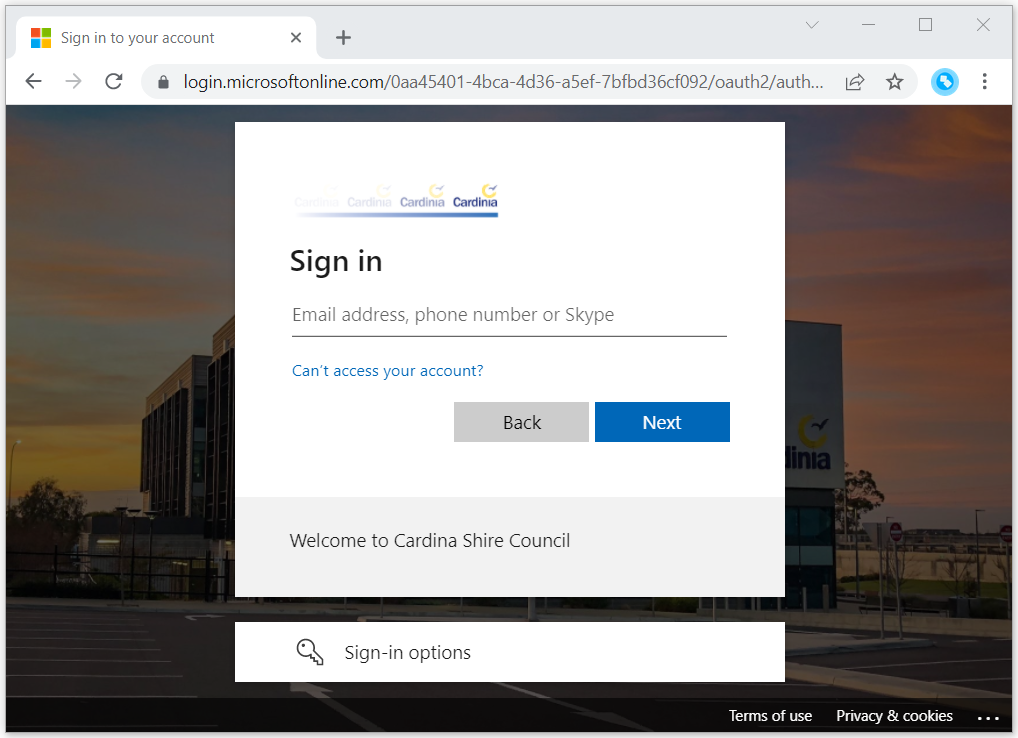
If the user is not already logged in, the browser is redirected to the Microsoft login page.
Once signed in, users will have access to internal datasets for as long their Microsoft account remains logged in.
#
Permissions
Whether a user can access private datasets is based on whether the user is given permission by the organisation to access the MS App Proxy endpoint that is dedicated for Pozi.
As long as the staff member or other authorised user has permission to access the MS App Proxy endpoint ( eg https://<poziservername>-<councilname>.msapproxy.net/
), then they will have access to the internal datasets that have been configured within Pozi.
#
URL
Users use a separate URL that enforces a login to Azure Active Directory before the browser loads the Pozi site.
Example:
- Public URL:
https://<sitename>.pozi.com/
- Staff URL:
https://<sitename>.enterprise.pozi.com/
#
Azure Configuration
#
Application Proxy (Enterprise Application)
Azure
: Enterprise Applications => <PoziServer> => Application Proxy
Follow the Microsoft documentation for set up:
Choose, depending on the way the Pozi Server has been configured one of the 2 following sections for the correct settings.
#
PREFERRED: IIS + QGIS Server only (i.e. without Pozi Connect Server)
The following settings are for a Pozi server setup with only QGIS Server and IIS.
Internal Url :
http://<servername>/
. Replace<servername>
with the actual name of the server.When visiting the above URL on the internal network, it should show an Internet Information Services welcome page.
External Url:
https://<poziservername>-<councilname>.msapproxy.net
.Choose a name for
<poziservername>
that easily relates to the actual server that Pozi is running on in the internal network (e.g.poziserver
).The
<councilname>
is a name that has been given to the organisation by MS Azure.Pre Authentication:
Azure Active Directory
.
Do not choose Passthrough
as that will give any visitor access to the internal network, potentially creating a security risk.
When configured correctly, a request from a logged-in user to URL (for example)...
https://<poziservername>-<councilname>.msapproxy.net/pozi/qgisserver/wfs3.json
...should return the same response as a local request to...
http://<servername>/pozi/qgisserver/wfs3.json
Ensure it doesn't return a response to a non-logged-in or anonymous user.
#
LEGACY: Pozi Connect Server + local DNS
The following settings are for a Pozi server setup with a Pozi Server installation that proxies all QGIS Server and IIS requests.
Internal Url :
https://local.pozi.com
(or any other URL that uses a local DNS with a locally signed SSL certificate pointing to the server that runs PoziServer)When visiting the above URL on the internal network, it should show a Pozi Connect Server welcome page.
All other settings here (like External Url and Pre Authentication are the same as above)
When configured correctly, a request from a logged-in user to URL (for example)...
https://<poziservername>-<councilname>.msapproxy.net/resourcecheck/<sitename>.json
...should return the same response as a local request to...
https://local.pozi.com/resourcecheck/<sitename>.json
Ensure it doesn't return a response to a non-logged-in or anonymous user.
#
Other settings:
#
App Registration
Azure
: App Registrations => <PoziServer>
- Set Pozi up in Azure as a registered app (admin privileges required): https://docs.microsoft.com/en-us/azure/active-directory/develop/howto-create-service-principal-portal
- Record the Application id (also known as as client id) as well as tenant id
#
Authentication
#
Web - Redirect URIs
Add the App Proxy Url to Redirect URIs
to the Web
section. E.g.:
https://<poziservername>-<councilname>.msapproxy.net/
#
Single Page Application - Redirect URIs
Add the following Redirect URIs
to the Single-page application
section:
https://<sitename>.enterprise.pozi.com/
https://staging.pozi.com/master/
(for client testing/debugging)http://localhost:3000/
(for Pozi development purposes)- If needed, add any extra URIs that the client uses (e.g.
https://<sitename>-qgis.enterprise.pozi.com/
)
#
Implicit grant and hybrid flows:
Access tokens
andID tokens
should remain unchecked
#
Advanced settings:
- Set
Allow public client flows
toNo
#
Authorisation
All going well, it should be possible to visit the App Proxy URL (in our example case: https://<poziservername>-<councilname>.msapproxy.net/
). If an error is shown like: Sorry, but we’re having trouble with signing you in.
with a text similar to below, then we will need to give the relevant users/groups access.
Example authorisation error:
AADSTS50105: Your administrator has configured the application Pozi Server ('xxxxxxxx-xxxx-xxxx-xxxx-xxxxxxxxxxxx') to block users unless they are specifically granted ('assigned') access to the application. The signed in user 'xxxxxxxxx.xxxxxxx@xxxxxxxxxxx.xxx.xxx.xx') is blocked because they are not a direct member of a group with access, nor had access directly assigned by an administrator. Please contact your administrator to assign access to this application.
Steps to authorise users/groups
Azure
: Enterprise Applications => <PoziServer>
- In the Azure Portal, go to Enterprise Applications, select the enterprise application for the Pozi Application Proxy
- Under
Manage
, selectUsers and groups
- If no users/groups have been defined, it will say something like
No application assignments found
- Click on
+ Add user/group
- In the next page, click on the text
None selected
under`Users and groups - On the right a panel should pop up with all available users/groups. Assuming that we want all users to have access, click on the group
All users
and click onSelect
in the bottom. - It is worth taking note of the the info text
When you assign a group to an application, only users directly in the group will have access. The assignment does not cascade to nested groups.
, especially when one chooses a group that contains other groups. In the case ofAll users
, this is not an issue. - Under
Select a role
, the roleUser
is preselected and cannot be changed. That is OK. - Click on
Assign
in the bottom of the page.
Access should now be granted to the application proxy and the URL should be accessible.
#
API Permissions
- Give Pozi the following permissions:
- API/Permissions Name:
User.Read
, Type:Delegated
, Admin consent required:No
. This should allow Pozi to determine access based on a user's role(s).
- API/Permissions Name:
#
Site URL (Enterprise vs public)
Using <sitename>.enterprise.pozi.com
forces user to authenticate before proceeding to the Pozi site. These users will gain access to the private datasets.
Public users should continue to use <sitename>.pozi.com
. They will not be prompted to authenticate, and they will have access to only public data.